반응형


유니티에서 Export한 VRM을 언리얼로 Import 했을 때, BlendShape가 비정상적으로 작동하는 에러가 있었다.

BlendShape를 조절하면 모델에 변화는 일어나는데 해당 키에 해당하는 Vertex가 앞뒤로만 움직이는 기현상이 발생했다.

위 사진과 같이 오작동이 일어난다. VertCount 수가 잡히는거 보면 데이터도 잡혀있기 때문에 혹시 몰라 Mesh를 확인해봤지만..


Mesh역시 이상없이 잡혀있다.

UniVRM의 다른 최신버전을 구해서 Export하면 정상적으로 움직이긴했지만, 언리얼로 Import하면 쉐이더가 맛이 가버려서 다른방법을 찾아봤다.


- 해결방법

방법은 최신버전을 버리는 것.

VRM을 처음다뤄봐서 일단 최신버전만 구성해서 데이터를 Export했더니 최신버전에서 문제가 있는모양이다.

유니티 버전 : 2019.4 LTS

UniVRM : 0.99 이하

위 버전으로 맞춘 뒤, VRM Export한 데이터를 언리얼로 Import하여 BlendShape를 조절하면 정상적으로 작동한다.


UniVRM v0.99 Github : Releases · vrm-c/UniVRM (github.com)


Release v0.99.0 · vrm-c/UniVRM

Unity-2019.4 の最終版です。 次から、最低バージョンを Unity-2020.3 に上げる予定です。 リリース前の動作チェックが Unity-2020.3 になります。 Download for Unity-2019.4.LTS or later UniVRM-0.99.0_f9ee.unitypackage

github.com


반응형
반응형


※ 명령패턴 설명


명령 패턴 (Command pattern)

1. 명령패턴 (Command pattern) 명령(이동, 점프 등)에 대한 함수를 클래스로 래핑하여 해당 클래스를 객체화 한 것이다. 사용자(캐릭터)를 명령에 대한 매개변수로 만들어 요청을 대기시키거나 로깅

srdeveloper.tistory.com


1. 실행 취소 기능

명령 패턴으로 실행 단위를 객체로 만들어두면 손쉽게 실행취소 기능을 구현할 수 있다.

위와 같이 Command 객체에 대한 List를 만들고 추가 명령이 생성되면 List의 맨 끝에 추가한 뒤, 현재 명령으로 기억하면 된다. Undo의 기능만 넣게되면 현재명령은 지워주고 현재 명령을 이전 명령으로 위치를 잡아주면 되고, Redo 기능을 같이 추가하게되면 실행 취소 전의 명령은 그대로 살려주면 될것이다.


2. 예시 코드

2-1) Command(추상 클래스)

public abstract class Command
{
    protected int direction;
    protected Actor actor;

    public abstract void Execute(Actor actor);
    public abstract void ExecuteAxis(Actor actor);
    public abstract void Undo();
}


2-2) VerticalCommand(Command 상속)

using UnityEngine;

public class VerticalCommand : Command
{
    public VerticalCommand(Actor actor, int direction)
    {
        this.actor = actor;
        this.direction = direction;
    }
    public override void Execute(Actor actor)
    {
        
    }

    public override void ExecuteAxis(Actor actor)
    {
        actor.MoveTo(new Vector2(0, direction));
    }

    public override void Undo()
    {
        actor.MoveTo(new Vector2(0, -direction));
    }
}


2-3) HorizontalCommand(Command 상속)

using UnityEngine;

public class HorizontalCommand : Command
{
    public HorizontalCommand(Actor actor, int direction)
    {
        this.actor = actor;
        this.direction = direction;
    }
    public override void Execute(Actor actor)
    {
        
    }

    public override void ExecuteAxis(Actor actor)
    {
        actor.MoveTo(new Vector2(direction, 0));
    }

    public override void Undo()
    {
        actor.MoveTo(new Vector2(-direction, 0));
    }
}


2-4) Actor

using UnityEngine;

public class Actor : MonoBehaviour
{
    private Rigidbody2D rb;

    private void Start()
    {
        rb = GetComponent<Rigidbody2D>();
    }

    public void MoveTo(Vector2 pos)
    {
        rb.MovePosition(rb.position + pos);
    }
}


2-5) InputHandler

using System.Collections.Generic;
using UnityEngine;

public class InputHandler : MonoBehaviour
{
    [SerializeField]
    private Actor targetActor;

    private List<Command> commands = new List<Command>();
    private int executionIndex = -1;

    private void Update()
    {
        Command targetCommand = HandleInput();
        if(targetCommand != null && targetActor != null)
        {
            commands.Add(targetCommand);
            executionIndex++;

            targetCommand.ExecuteAxis(targetActor);
        }
    }

    private Command HandleInput()
    {
        if (Input.GetKeyDown(KeyCode.W))
        {
            return new VerticalCommand(targetActor, 1);
        }
        else if (Input.GetKeyDown(KeyCode.S))
        {
            return new VerticalCommand(targetActor, - 1);
        }
        else if (Input.GetKeyDown(KeyCode.A))
        {
            return new HorizontalCommand(targetActor, - 1);
        }
        else if (Input.GetKeyDown(KeyCode.D))
        {
            return new HorizontalCommand(targetActor,1);
        }
        else if(executionIndex >= 0 && Input.GetKey(KeyCode.LeftControl) && Input.GetKeyDown(KeyCode.X))
        {
            commands[executionIndex].Undo();
            commands.RemoveAt(executionIndex);
            executionIndex--;
        }

        return null;
    }
}


※ 위 코드는 Undo의 기능만 구현해서 짠 코드이다.

※ 생성자에 Actor를 인자로 받는 이유는 플레이어만이 아닌 다른 캐릭터에 대한 실행취소도 포함하기 위함이다.

※ 앞선 커맨트 패턴의 게시글의 코드를 재활용해서 짠 코드이므로 Actor에 붙어있는 Rigidbody의 GravityScale의 값을 0으로 설정해야 정상적으로 작동 된다.


3. 실행 확인


반응형

'Stack > DesignPattern' 카테고리의 다른 글

명령 패턴 (Command pattern)  (0) 2024.02.23
반응형


1. 명령패턴 (Command pattern)

명령(이동, 점프 등)에 대한 함수를 클래스로 래핑하여 해당 클래스를 객체화 한 것이다.

사용자(캐릭터)를 명령에 대한 매개변수로 만들어 요청을 대기시키거나 로깅하여 되돌리기 기능의 연산을 지원할 수도 있다.

※ 일반적으로 실행 취소 기능을 구현하려면 힘들지만 명령 패턴을 사용하면 쉬워진다.
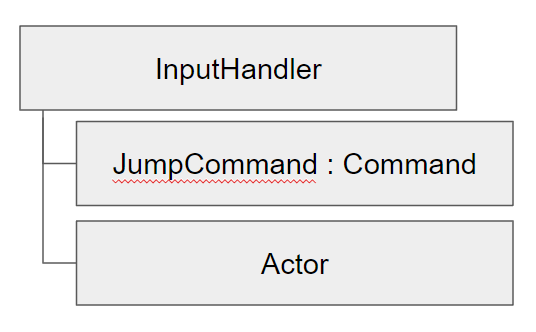


2. 명령패턴 예시 구조 및 코드

InputHandler 클래스에서 틱마다 키 입력을 받을 수 있는 로직을 구성하고, 점프키에 해당하는 조건문이 통과하게 되면 JumpCommand 객체를 반환하고 반환된 Command 객체에 Actor 객체를 매개변수를 넘겨서 Command의 Execute 함수에서 Actor의 Jump함수를 호출해주는 구조이다.


2-1) Command(추상 클래스)

public abstract class Command
{
    public abstract void Execute(Actor actor);
}


2-2) JumpCommand(Command 상속)

public class JumpCommand : Command
{
    public override void Execute(Actor actor)
    {
        actor.Jump();
    }
}


2-3) Actor

using UnityEngine;

public class Actor : MonoBehaviour
{
    private Rigidbody2D rb;

    private void Start()
    {
        rb = GetComponent<Rigidbody2D>();
    }

    public void Jump()
    {
        rb.AddForce(Vector2.up * 5f, ForceMode2D.Impulse);
    }
}


2-4) InputHandler

using UnityEngine;

public class InputHandler : MonoBehaviour
{
    [SerializeField]
    private Actor targetActor;

    private Command jumpCommand = new JumpCommand();

    private void Update()
    {
        Command targetCommand = HandleInput();
        if(targetCommand != null && targetActor != null)
        {
            targetCommand.Execute(targetActor);
        }
    }

    private Command HandleInput()
    {
        if (Input.GetKeyDown(KeyCode.Space))
        {
            return jumpCommand;
        }

        return null;
    }
}


각 명령(Command)에 대한 객체를 생성함으로써 직접적으로 함수를 호출하는 방식 대신, 한 겹 우회하는 계층을 만들어 입력 키의 교체가 가능하게 되었고, 각 명령 객체의 Execute에 Actor를 인수로 받게 함으로써 플레이어 캐릭터만이 아닌 여러 NPC, 몬스터 등의 캐릭터도 조작이 가능할 수 있도록 구성되어 있다.

※ 키 변경의 경우, 멤버 변수의 객체를 교환함으로써 키 변경이 가능하다는걸 알려주는건 이해하는데, 이게 과연 효율적인가 싶은 의문이 든다. 차라리 키 변경은 Command 객체를 교체하는것이 아닌 키를 변수로 둬서 키 값을 교체하는게 더 효율적일거같은 생각이 든다.


반응형

'Stack > DesignPattern' 카테고리의 다른 글

명령패턴 실행취소 기능  (0) 2024.02.27

+ Recent posts